Infotx

Welcome to Infotx - Webmaster Guides and Resources.

Web hosting FTP.

FTP


"Publish to the Web" isn't working in MS Publisher. Is there another way?


Here is another way to prepare and publish a website built in Microsoft Publisher. We recommend the following steps:


1.

Create an empty folder on your desktop as a clean location for the files you are about to upload.

2.

Open the website you created in Microsoft Publisher.

3.

Open the homepage from the pages you created if you have created more than one page.

4.

Go to the file menu and select "Save as".

5.

Browse to the folder you created on your desktop.

6.

Set the "save as" type to "webpage" (make sure you do not select "single file web page" as that will not work.

7.

Set the file name to be "index.htm"

8.

Click Save.

9.

Check the new folder you had created to see if there is a file named index.htm and a folder named index_files. If you do not see these two files or they are named differently you will need to delete the folder and start over at step one.

Once you have reached this step and have the correct files you are ready to upload them.
Please note that you need to upload the index.htm and index_files folder to your public_html folder for your website to be visible from the Internet.


Can I FTP from a web browser?


Yes you can.

Your Control Panel comes equiped with Unlimited FTP a great browser based FTP tool to use if you or others need to transfer files from different computers or locations to your account.

UFTP will allow you to login as the admin user or through individual user accounts assigned to a specific folder. This is great when you want to FTP on the go without having to download additional software or allow admin access to all users.

The first step to get this going is to create your user accounts. Please carefully follow the instructions below.

1. Log into your Administrative Control Panel (cPanel)

2. On the main screen locate and click on the icon that says FTP Manager. (This may be
located under your Site Management Box)

3. This will take you to the FTP Account Maintenance page. If it does not you need to click "BACK" and locate the FTP
Manager.

4. Click on FTP Accounts.

5. In the center of the screen locate and click on "ADD FTP ACCOUNT".

6. Enter the username for the new FTP account in the blank field next to Login - the
login name can be anything you want to assign to the individual that will be using
the account (example: Mike, Dave, test etc..).

7. Enter the password for the new FTP account in the blank field next to Password -
enter the password for the person who will be using this account (NOTE: the password
must be longer than 5 characters)

8. In the Directory: "/home/username/public_hmtl" field you will need to add the name of
the directory you would like this person to have access to: (example: mike, dave, test,
newclient, etc...)

WARNING:

If you do not put something in the field next to "/home/username/public_hmtl", the new FTP user will have access to public_html and all sub-directories. To ensure that an FTP user can only access a specific folder or subdomain set the directory box to the same value as the folder or sub-domain. To see where a subdomain's root director is located see the KB article [linked here] for subdomains. The new user will have read/write access to the directory you assigned and all sub-directories.

[Example] If you choose to add the user test, and give the user access to /home/username/public_html/test directory, the user will be able to add, edit, rename and remove any file or sub-directory under /home/username/public_html/test.

Once you have everything the way you want it click on "CREATE" to create the new FTP account. After the account has been created, you should see:

FTP Account Added!
The FTP account [user] with password [password] was added.

Now that you have created a new FTP Acciount, you can test it out. Copy and paste or type the following URL into any web browser:

http://yourdomainname

You will come to a screen asking for the following:

"Login
Domain Name or Username:"
Insert the username in the field. If you are not the main user on the account your username will look like: [username@yourdomain.com]

NOTE: The ftp username for anyone but the main account holder is always the username you created with and @ sign and
then your domain name [yourdomain.com]attached to the end. It will look like an e-mail address.

"Password"
Insert your password for your username. This is the password you assigned when the account was created.

If you have lost or forgetten the password you will need to go back to the FTP Account Maintenance page. Locate the username. On the same line is a small box titled "PASSWORD". Click on this box. The window will change. Enter a new password. Click on the "CHANGE" button. If changes successfully you should receive the following message:

"Account Password Changed!
Syncing Ftp Databases....Done"

Upon logging in you may be prompted to allow Java to run you will want to press the button that says [Run].

You will now be on a screen that shows your computer on the left and the IP address of you server on the right.
At this point you simply need to locate the files on your "computer" (left side). To transfer the file highlight it by clicking on it once on with the mouse (to highlight and transfer multiple items hold down [Ctrl] on your keyboard while clicking the desired files) and then click the "UPLOAD" button in the bottom middle of the screen.

If the files successfully load you should see them appear on the right half of the screen.

NOTE: If you have access to more than one directory you need to make sure that you have opened that directory on the right side of the FTP window, otherwise you will upload you files in to the wrong location.


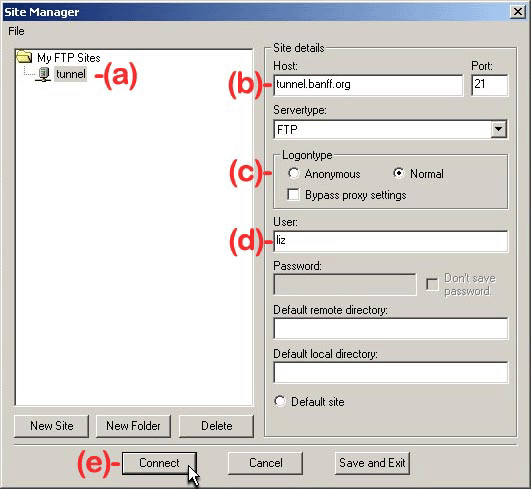
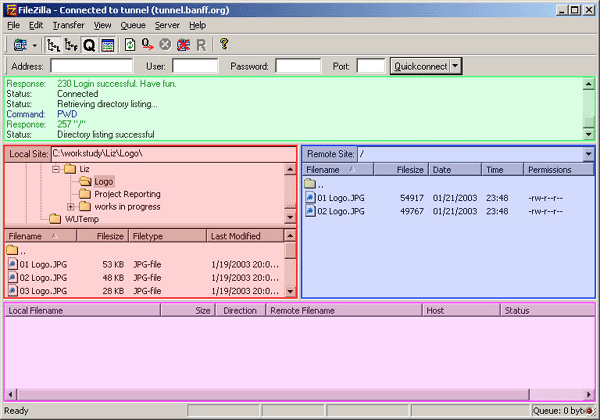
I would like to use filezilla how do I go about the setting it up and connecting to my site?


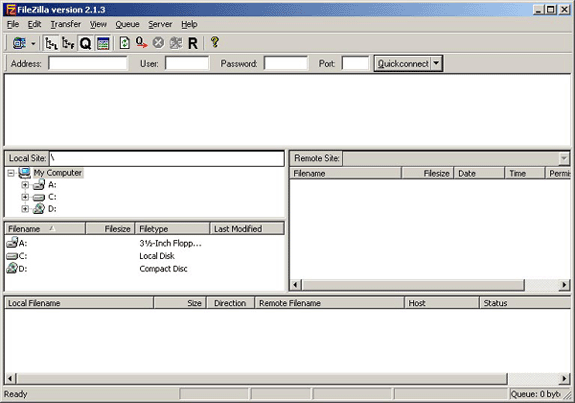
This is a quick tutorial on using FileZilla.
Computer / Software You Will Need:

  • A PC running Microsoft Windows, or linux.
  • The FileZilla software, which you can download by clicking here.

Individual Server Settings:
Username
This is your username to access your account.
Password
This is the password assigned to you by the sysadmin.
Using FileZilla
After you have downloaded and installed FileZilla, double click the icon to launch the program. The first thing you will see will look like the following screen shot:
ftp
1. Click on File then select Site Manager.
2. You will see the "Site Manager" window pop up (pictured below). Click on "New Site"
ftp
3. You will want to change the values (marked in red letters) as indicated below: (Everything else should be left as default)
(a) Type in the New FTP Site Name: (Can use any name like "myFTPsite")
(b) Host: Type in the host address: (Your FTP address like ftp.mydomain.com)
(c) Logontype: Select .Normal
(d) User: This is your username. (Usally it is the first 8 characters of your domain)
(e) When the above steps are complete, click 'Connect' to connect to the server. (You will automatically be connected in your own folder).
4. Type in your password when you are prompted to, then click OK. (The one you set up to access your account)
ftp
Once you have logged in, you will see a screen similar to this:
ftp

  • The very top window (highlighted green) shows your connection status.
  • The Local Site windows (highlighted red) shows the directories (top red window) and files (bottom red window) on your computer.
  • The Remote Site window (highlighted blue) shows server, where you can upload your files.
  • The bottom window (highlighted purple) shows the status of the files as they are uploaded or downloaded

How to Upload a File

  • Locate the file you wish to upload by first clicking on the directory it is in (top red window), then by finding it in the list of file names (bottom red window).
  • Select the file by clicking on it with the left mouse button.
  • Hold down the left mouse button and drag the file over to the Remote Site (blue window), then release.

How to Download a File

  • To download a file, follow the same procedure above in "How to Upload a File", only select files from the Remote Site (blue window) and drag them to the Local Site (red window).

Please Note
Due to a firewall some people have been experiencing problems with FTP. To fix this problem, try:
Clicking on Edit, then select Settings. Click on Firewall Settings, which is found underneath Connection in the left hand window (see diagram below). In the Firewall settings window (right side), click the Passive Mode checkbox to turn it on if it is currently off. If it is on, click the same checkbox to turn it off. If you connect to the server and get disconnected quickly, this is the solution.
ftp


How do I connect and upload via FTP with WS_FTP?


File Transfer - WS_FTP - Version Pro 7.6 - Connecting and Uploading

Step 1:
Open WSFTP and click on File and Choose Connect.

Step 2:
Click on Create Site.

Step 3:
Enter a Name for your site (anything) and leave Create In blank. Click Next.

Step 4:
Type in your domain name as the hostname and click Next.

Step 5:
Type in your username and password. Leave the account field blank. You can choose to save the password. Click Next.

Step 6:
Server Type should be set to FTP and the Port is 21. Leave SSL unchecked. Click Finish.

Step 7:
Once back to the connect screen, select the site and click on Edit.

Step 8:
Click on the Startup Tab and type public_html for the remote site folder and click Ok.

Step 9:
Select the site again and click on Connect.

Step 10:
Click the Browse Local Folders button.

Step 11:
Select the folder that contains your HTML Files.

Step 12:
Select the files that need uploading and click the right arrow to upload files.


How do I connect and upload via FTP with Dreamweaver?


File Transfer - Dreamweaver - Version MX- Configuring FTP

Step 1:
Open DreamWeaver MX. Click on Site and choose New Site.

Step 2:
Click on the Advanced Tab. For site name, enter a phrase that describes your site. Dreamweaver will choose a local root folder for you. Also, enter your HTTP address and click on the Remote Info category.

Step 3:
Change Access to FTP. Then enter your FTP Host which is your domain name (yourdomain.com) or your server's IP. For Host Directory, please type in public_html. Then enter your login name and password.

Step 4:
Still on the same screen, place a check in Automatically upload files to the server on save.

Step 5:
Click on the connect to remote site button.

Step 6:
Make sure the second drop down reads Remote View. You will see a list of files in your public_html folder.

Step 7:
DoubleClick any file, edit it, and choose save. Dreamweaver will automatically update it on the server.

Step 8:
Should you ever add images or other files that need to be upload, select local view from the site drop down.

Step 9:
Select the files that need uploading and click the PUT button (up arrow).


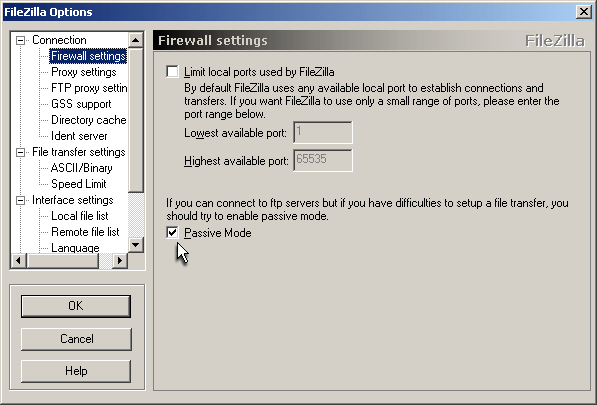
Why does my FTP connection slow down to nothing?


To protect users, many hosting companies firewall is very restricted. With some Internet Service Providers, data packets are slightly altered in the ISPs routing and firewall does not recognize it as a valid connection which is why your ftp connection slows down. To eliminate this problem you can use Secure FTP. To use Secure FTP, you must apply for SSH access.

A free ftp client that will handle Secure FTP is Filezilla. You can download it from filezilla.sourceforge.net


Now launch Filezilla and the following will walk you through how to setup a Secure FTP connection

1. First go to File...then Site Manager
2. Then click the New Site button
3. Give your new connection a name and select the Host field on the right and type in your domain name
4. Select the Server type dropdown box
5. Select the SFTP using SSH2 option. Remember that this option is ONLY going to work if you have applied for and received SSH access.
6. Then select the Normal option for the Logon type
7. Select the User field and type in your ftp username
8. Then click the Connect button
9. Type in your password and then click the OK button
10. It will now let you connect using Secure FTP. Just upload your files like you would as normal. When you need to connect again, just go to the Site Manager in Filezilla and choose the appropiate connection


Where Can I Obtain an FTP Client?


A. There are a few popular places to get a FTP program. Below are a few of the sites:

As General Software download site http://download.com (Recommend Core FTP Lite)
An FTP client for Windows is available at http://www.ipswitch.com or http://filezilla.sourceforge.net
An FTP client for Macintosh is available at http://www.stairways.com/anarchie/


How do I FTP to my addon domains without interfering with my main account.


You can either log in as the addon domain or logon as the main account and put everything in the addon domain folder.

To log in as the addon domain it will be
Username: **Addon_folder**@**Main_domain.com**
password: **the password your chose when setting up the addon domain**
Host: **addon domain or main domain, either will work**.
Folder or Directory: /

To use the main account just log in like normal and navigate to the **addon_folder** and place your files there.

NOTE:If you have FrontPage you will need to publish to the Add-On Domain directly i.e.
http://www.addondomainname.com

You can publish with your primary username and password.


Publish settings for Web Easy Professional (versions 5 & 6 tested)


1. Go to the tools menu, click options, select Programs, under website publishing programs select default publish assistant and click ok to close the window.

2. Click tools menu again, click Publish Assistant and click next.

3. Click the button labeled Connect.

4. In the Connection Profile window, type in a name for the profile like your domain name. Then, where it says Host name or IP address: type in ftp.yourdomainname.com or the server IP address.

5. Where it says User identifier: type in your user name (sent to you in the welcome email, it is 8 digits and similar to your domain name.)

6. User password: type in your account password (Also sent to you in the welcome email.)

7. Now, click the tab named General in the same Connection Profile window. In the Initial remote folder field type in:
public_html/ (Type this only for the main domain, if you have an addon domain see below)
Addon Domains, type in:
public_html/addonfoldernamehere/

The name for the addon domain folder can be found in your account cpanel by clicking addon domains, it will be listed next to the domain. For example:
my addon domain name is http://www.abc.com the folder would be named abc and the full path would be:
public_html/abc/

8. Under the WWW Site tab in the same Connection Profile window, where is says World Wide Web URL type in http://www.yourdomainnamehere.com and select the primary page as index.htm

9. After all these settings have been entered, click ok. You will immediately see a message stating:
The last message from the server is:
Your bandwidth usage is restricted
User youruser has group access to: youruser OK. Current restricted directory is /
You may close this window.

10. Click next and proceed to publish.


How do I connect and upload via ftp with Adobe GoLive?


File Transfer - GoLive - Version 6.x - Connecting and Uploading

Step 1:
Open Adobe GoLive and click on Edit and choose Servers.

Step 2:
Click on the New Item Button.

Step 3:
Fill in the information requested. Nickname can be anything. Server is ftp:// followed by your domain name. The directory is public_html. Lastly, enter your username and click OK.

Step 4:
Click Site in the main file menu and choose FTP Server and click on the NickName you gave your site. This will put a check mark on your site.

Step 5:
Click Site at the top again and choose FTP Server and click Connect.

Step 6:
Enter your username and password and click OK.

Step 7:
Select the files in the left column that need to be uploaded and click and drag them to the right column.

Step 8:
When you visit your site, you should be able to see your newly uploaded files.


I am loading my page through FTP but my connection drops before I can complete the transfer.


This is a result of 1 of 3 things (in general)
1) A local Firewall or Anti-Virus software is severing the connection.
To check this, TEMPORARILY deactivate your firewall / Anti-Virus software and try again. (make sure to check your local windows firewall if you are running windows)

2) Your connection through your ISP is being severed, to check this you can contact your ISP and have them give you an FTP test.

3) The server is not responding or having issues.

Other than that the issues will vary depending on the local machine and environment.


How do I upload my page to your server using FTP on a Mac?


File Transfer - Fetch (mac) - Version 4.0.3 - Connecting and Uploading

Step 1:
Open Fetch. It will prompt you to enter some login info.

Step 2:
For Host, type your domain name. Also type in your username and password and click OK.

Step 3:
Once you have logged in, open the public_html folder. To open it, double-click it.

Step 4:
Once in the public_html folder, click Put Files.

Step 5:
Select the picture you want to upload. Then click on Choose.

Step 6:
Fetch will confirm the file name that will be uploaded and saved. Click OK to upload.

Step 7:
When you look under public_html, you should see the newly uploaded file.


How do I create an FTP account?


1. Login to your control panel http://yourdomain.com/cpanel/
2. Click on 'FTP Manager'
3. Choose 'FTP Accounts'
4. Click 'Add FTP Account'
3. Enter the username and password you want, along with where you want to place them.

Note: If you want them to go directly into your public_html then put just a / in the "Directory" field.


How do I connect and upload via FTP with CuteFTP?


File Transfer - CuteFTP - Version 4.x - Connecting and Uploading

Step 1:
Open Cute FTP and choose File then Site Manager.

Step 2:
Click on the New Button.

Step 3:
Fill in the information requested. Host Address is your domain name. Also enter your username and password.

Step 4:
Make sure FTP port is set to 21 and click on the Edit button.

Step 5:
Under the General Tab, type in public_html for the Default Remote Directory and click ok.

Step 6:
Click the Connect button.

Step 7:
Now that we have connected, select the files that you would like to upload. Right click on the selection and choose upload.


How do I set up Anonymous FTP?


1. Login to your cpanel http://yourdomain.com/cpanel
2. Click on 'FTP Manager'
3. Select 'Setup Anonymous FTP Access'.
4. Check the option to "Allow anonymous access to ftp"

Note: If you want to allow them to upload also check "Allow anonymous file upload"

To connect to your site anonymously, please refer to the link under "Setup Anonymous FTP Access" under FTP Manager in your control panel.


When uploading large files (65mb) the transfer just stops after a few megabytes and then the server times out and disconnects the connection.


When uploading large files (65mb) the transfer just stops after a few megabytes and then the server times out and disconnects the connection. All other causes having been eliminated it appears there is some kind of flow control problem that causes the upload to stop - the server connection is not lost.

The size of the Transmit Buffer in CuteFTP (used to buffer uploads) just needs reducing. The new tweak option is in the config menus - go to Tools->Global Options->Transfer The Buffer settings are at the bottom of the Transfer panel - values should be multiples of 1024 bytes.

The default for both the Transmit & Receive buffers is 65536 bytes (64kb) which is fine for most servers but not all. Reduce the Transmit Buffer size until the problem disappears - if downloads are ok leave the Receive buffer at 64kb.

Recommended settings are 32kb - 32768 bytes // 16kb - 16384 bytes // 8kb - 8192kb Geeks may then wish to increase buffer size in 1024 byte jumps to find a maximum stable setting. 16kb appears to have no impact on upload speeds.

CuteFTP sets its Transmit & Receive buffers at the maximum allowed setting of 64kb - which is apparently much larger than the default for most other FTP clients. Smart FTP has the same tweak option - but uses default values of only 2kb Transmit and 8kb Receive.


Why am I Receiving a "Blocking Call Cancelled" Error in WS_FTP?


The "blocking call cancelled" error is actually from within WS_FTP and your local computer. WS_FTP suggests the following solution if you receive one or more "Blocking call cancelled" messages and the file transfer is incomplete:

If you are using the Microsoft TCP/IP stack, part of the Windows 95 and NT operating systems, try setting the Maximum Transfer Unit (MTU) to 576.